Home Improvement Project: Installing A Gravel Rock Strip Around Your Home
Adding a gravel rock strip around your home has many benefits that are both functional and aesthetically pleasing.
Growing up, we had a rock strip around our home and I never understood why my dad was always raking the rocks back into the strip, but now that I understand the benefits of having a rock strip, I’m ready to install one of my own!
In this article you’ll learn the benefits of installing a rock strip around your home, how to achieve this, and then we’ll give you information on where you can source your rocks, how much gravel or rock you’ll need, and the best time to lay your gravel.
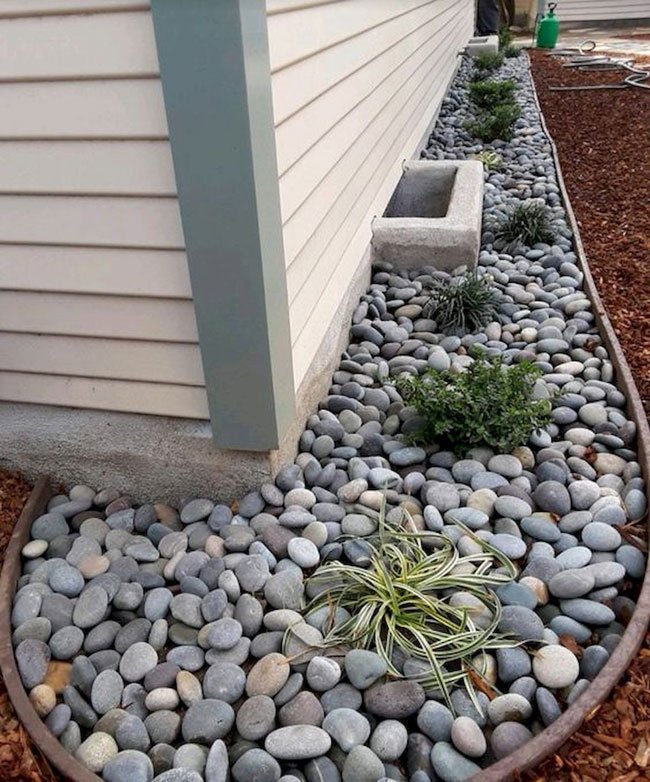
Photo by Proud Home Decor
WHY SHOULD I INSTALL A ROCK STRIP AROUND MY HOME?
There are several reasons why you might consider laying a gravel rock strip around the base of your home or garage besides just looking aesthetically pleasing.
Here are a few:
Prevent Erosion from Rain and Snow
A gravel strip can help weather-proof your home. Use your rock strip to control erosion, slow rainwater, and direct rain and snow away from the base of your home or garage. Directing rainfall away from your home helps prevent surface damage on your home’s exterior.
For more reading on preventing yard erosion check out this article from New Homes & Ideas.
Low-Cost, Low Maintenance
A rock strip is low-cost, you don’t need very many materials and gravel and rocks are quite affordable. Weeds will not come through the rock strip as readily so rock strips are low-maintenance and the rocks will last for decades to come.
You may have to toss or rake rocks back into the pile occasionally (especially after a hard rain) but other than that you’ll only have an occasional weed to pull.
Provide A Decorative Border
Adding a rock strip around your home provides a lovely decorative border. Having a photo of your home’s exterior handy when selecting your rock is a great idea. Then, you’ll be able to select rocks that compliment your home’s exterior.
HOW DO I INSTALL A ROCK STRIP AROUND MY HOME?
Grab a friend to help and gather your materials.
You’ll need:
-A garden shovel or spade
-A steel rake
-A hand tamper
-Crushed stone, gravel
-A wheelbarrow to carry stone
Step 1:
Mark the zone where you’ll lay your gravel for your strip. You can use spray paint or rope to mark your area so you’ll know where to dig.
Step 2:
Dig down 4 to 6 inches into your grass. Keep your lines clean so the final result will look sharp.
Step 3:
Use your steel rake to clean up the dirt path and make it smooth on the bottom and sides. You can turn your steel rake upside down and use the flat bottom to help flatten everything even further. You can also use a hand tamper to compact your dirt, if necessary. This will help ensure your gravel doesn’t shift over time.
Step 4:
Lay your gravel. Use crushed stone as the base for your gravel strip and then work your way up to larger pieces of gravel and rock. You can also add water to your garden to help compact the soil and rocks, so the rocks will sit into the soil. Use your hand tamper to flatten your gravel strip down into place. For tips on how to use a hand tamper, check out this article by The Spruce.
TIP:
The best time of year to create your rock strip is Summer or Fall when there is minimal rainfall. It’s also best to avoid designing your rock strip in extreme heat.
NEED RIVER ROCK FOR YOUR DIY ROCK STRIP IN OKLAHOMA CITY?
We deliver 1 1/2” river rock, 2 ½” river rock, 3”-5” surge, coarse stone, or gravel to your home or work site.
Don’t know how much rock or soil you’ll need? Click here to use our handy calculator.
We can deliver your landscaping or hardscaping materials anywhere in the South Oklahoma City metro area, including Moore and Norman, Oklahoma.
Ready to order? Use our simple order form here.


